Unlock Unbeatable Flavor: The Easy Smoked Chicken Legs Recipe You Need
There's something undeniably satisfying about perfectly smoked chicken legs – that deep, smoky aroma, the tender meat falling off the bone, and ideally, a wonderfully crispy skin. If you've ever dreamt of achieving this backyard BBQ nirvana without the fuss, you've come to the right place. This comprehensive guide will walk you through an incredibly easy smoked chicken legs recipe, focusing on a simple yet transformative technique: brining. Forget dry, bland chicken; prepare for an explosion of juicy flavor that will make you the star of your next cookout.
Smoking chicken drumsticks is not only a fantastic way to impress friends and family but also an economical choice, allowing you to refine your BBQ skills without breaking the bank. Our approach prioritizes both simplicity and flavor, ensuring a classic result with minimal effort on your part. We'll cover everything from preparing your meat with an essential brine to achieving that coveted crispy skin, all while offering insights and tips to make your smoked chicken legs an absolute triumph. So, grab your tongs, perhaps a cold beverage, and let's dive into making some truly delicious smoked chicken drumsticks.
The Secret to Irresistible Juiciness: Why Brine Your Smoked Chicken Legs?
When it comes to succulent, fall-off-the-bone smoked chicken, proper meat preparation is paramount, and brining stands out as the unsung hero. Brining is a time-honored culinary technique that dramatically impacts the texture and moisture content of your chicken. Essentially, it involves soaking meat in a seasoned saltwater solution, which works its magic in two primary ways:
1. **Moisture Retention:** Through the process of osmosis, the brine's water and salt solution is absorbed into the chicken's muscle fibers. The salt helps to denature proteins, causing them to unravel and form a matrix that traps moisture more effectively. This means that even during the long, slow cooking process of smoking, your chicken legs will retain significantly more moisture, resulting in unparalleled juiciness.
2. **Flavor Infusion:** Beyond just adding saltiness, the brine acts as a carrier, infusing the chicken with the flavors of any additional aromatics like herbs, spices, garlic, or onion. This ensures that every bite is bursting with flavor from the inside out, rather than just relying on surface seasoning.
While both wet and dry brines have their merits, for our easy smoked chicken legs recipe, we highly recommend a wet brine. It's incredibly effective for drumsticks, ensuring deep penetration and consistent juiciness. For optimal results, aim for no less than 12 hours in the brine. This extended soak provides ample time for the solution to work its magic. Remember, food safety is crucial: always keep your brining chicken refrigerated. Even a short period at room temperature can compromise safety.
Crafting Your Simple Yet Potent Wet Brine
The beauty of a wet brine for smoked chicken legs lies in its simplicity and the readily available ingredients. Our foundational brine recipe requires just a few pantry staples, but allows for endless customization.
**Basic Brine Ingredients:**
* 4 cups water
* 1/4 cup apple cider vinegar (ACV)
* 1/4 cup Kosher salt (or non-iodized salt)
* 2 tablespoons granulated sugar
* 4-6 cloves garlic, minced or crushed
* 1/2 medium onion, roughly chopped
**Instructions:**
1. **Dissolve Dry Ingredients:** In a large container with a lid (large enough to submerge all your chicken legs), combine the water, apple cider vinegar, salt, and sugar. Stir vigorously until the salt and sugar are completely dissolved. This step is crucial, as undissolved particles can lead to uneven seasoning.
2. **Add Aromatics:** Once dissolved, add your minced garlic and chopped onion to the brine solution. The natural oils and flavors from these aromatics will integrate with the brine, permeating the chicken meat for an extra layer of savory deliciousness. Don't be shy about adjusting quantities here; you can always add more garlic or onion to suit your taste. For an even more complex flavor profile, consider adding a few bay leaves, peppercorns, or sprigs of fresh rosemary or thyme.
3. **Submerge Chicken Legs:** Carefully place your chicken legs into the container, ensuring they are fully submerged in the brine. It's vital that all surfaces of the drumsticks are in contact with the brine solution for even flavor and moisture distribution. If your container is packed tightly, give the chicken a gentle shake or rotate them midway through the brining process to ensure every part gets its fair share of the liquid.
4. **Refrigerate:** Cover the container and refrigerate for at least 12 hours, and up to 24 hours. This extended period is key to achieving that ultimate juiciness.
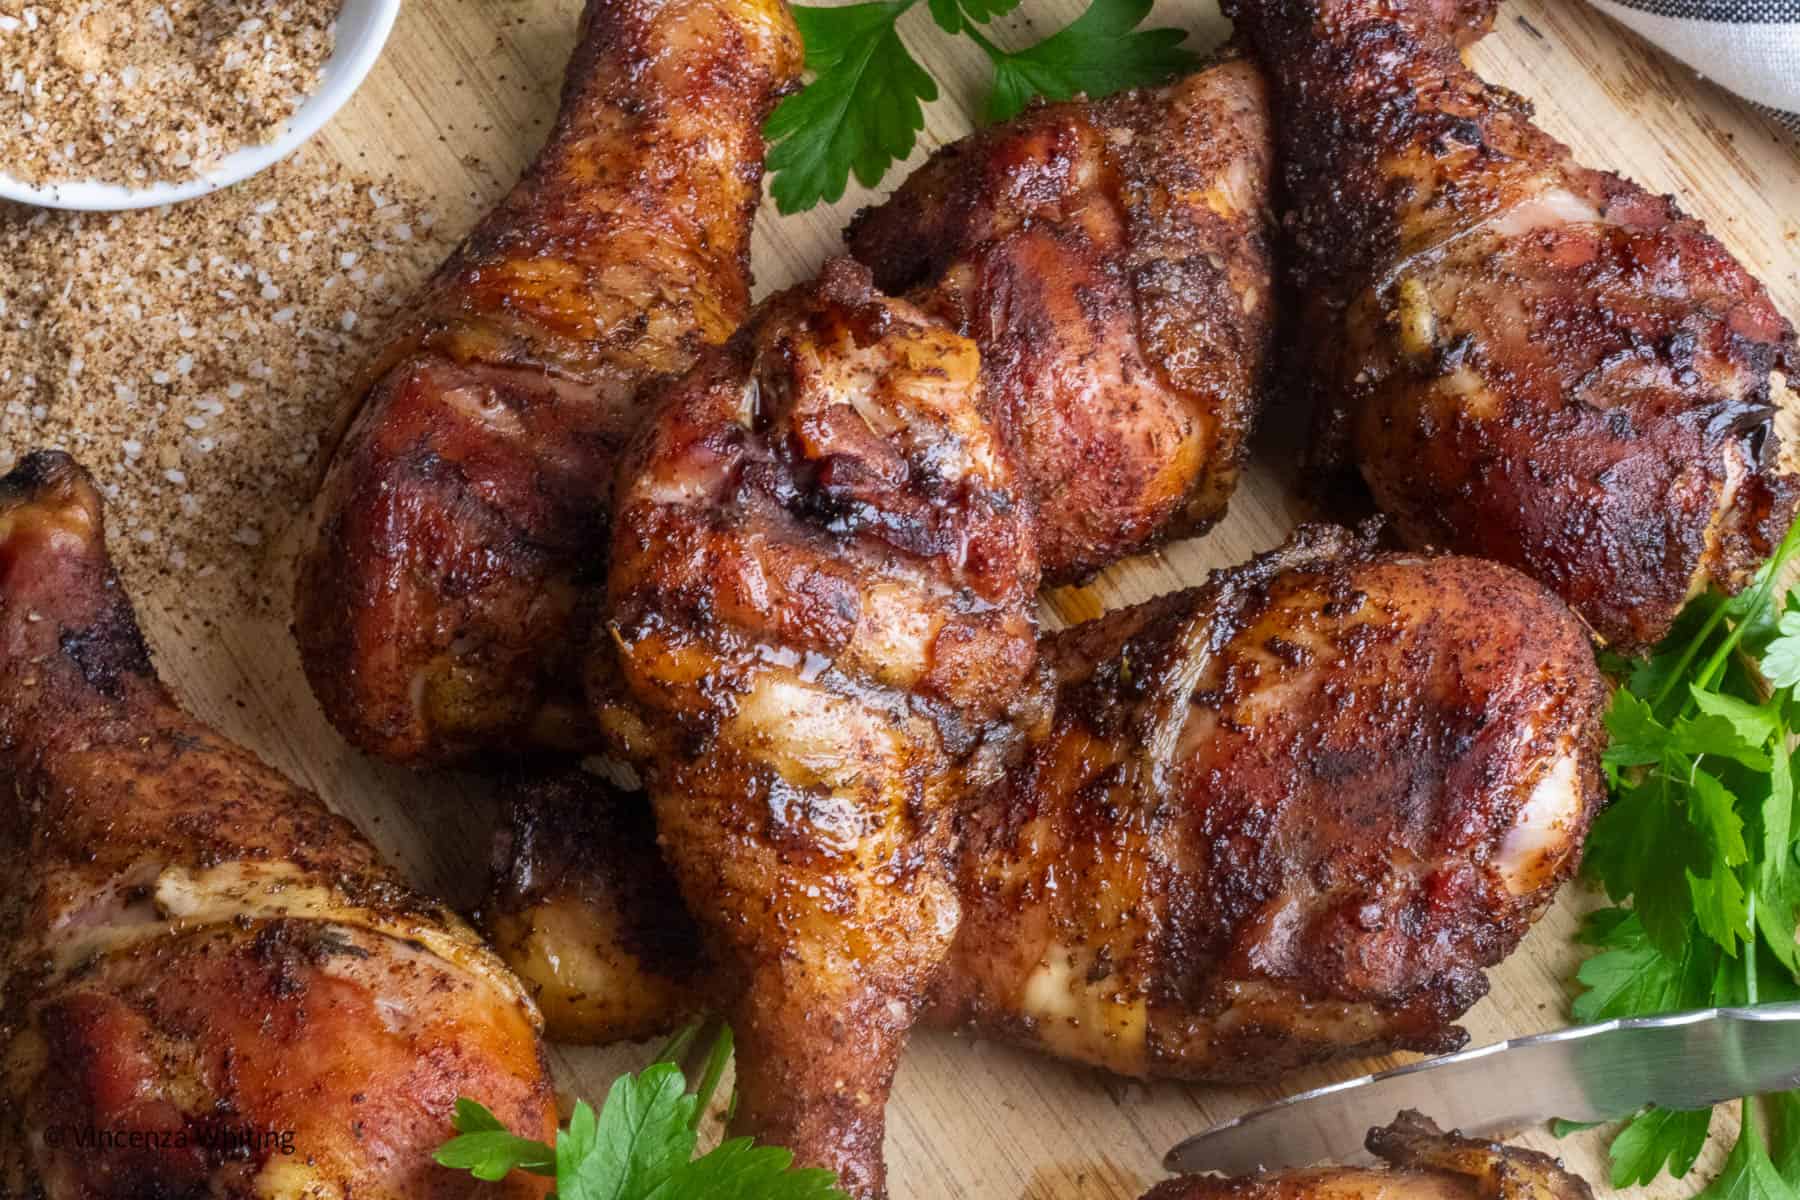
Achieving That Perfect Crispy Skin: Beyond the Brine
One of the most common complaints with smoked chicken legs is rubbery skin. While our brine ensures juicy meat, there's a crucial step to tackle the skin. Nobody wants soft, chewy skin on their smoked chicken drumsticks! The secret lies in a simple technique called **air drying** – a method that dramatically improves the skin's texture.
After your chicken legs have completed their brining bath, remove them from the solution and pat them thoroughly dry with paper towels. Then, arrange them on a wire rack set over a baking sheet. Lightly sprinkle both sides of the skin with a pinch of Kosher salt – this further seasons the chicken and aids in moisture extraction. Place the uncovered chicken legs back into the refrigerator for at least 4 hours, or ideally overnight, if time permits.
**Why does this work?** Air drying in the refrigerator allows the circulating cold air to slowly evaporate surface moisture from the chicken skin. This drier surface is far more conducive to crisping up when exposed to the heat and smoke of your grill, preventing that dreaded rubbery texture. Think of it as preparing a canvas for the perfect crisp. For more in-depth techniques on how to achieve that perfect crackling skin, check out our guide on
Crispy Skin Smoked Chicken Legs: Juicy Flavor, No Rubber!.
The Smoking Process: From Rub to Rack
With your chicken perfectly brined and air-dried, you're ready for the main event: the smoke! This stage brings all the flavors together and infuses your drumsticks with that characteristic BBQ goodness.
Preheating Your Smoker
Regardless of whether you're using a pellet grill, electric smoker, or charcoal smoker, the first step is to preheat it to **225°F (107°C)**. Maintaining a consistent low temperature is key for tender, smoked meat.
* **Pellet Grills:** Most pellet grills hold temperature very well. If your model has a "Super Smoke" setting, engage it for enhanced smoky flavor during the initial phase.
* **Other Smokers:** For offset or charcoal smokers, monitor your vents closely to maintain the desired temperature. Some pitmasters like to add a pan of water inside the smoker to help maintain moisture in the cooking environment, which can be beneficial for longer smokes, though less critical for chicken legs.
**Wood Selection:** The type of wood you choose will significantly impact the flavor profile.
* **Mild:** Apple, Cherry (great for poultry, impart a subtle sweetness and beautiful color)
* **Medium:** Pecan, Oak (versatile, good balance of smoke flavor)
* **Strong:** Hickory, Mesquite (use sparingly with chicken, can be overpowering)
Applying Your BBQ Rub
Once the chicken legs are out of the refrigerator from their air-drying stint, it's time for the final layer of flavor: your BBQ rub. You can use your favorite store-bought rub or craft your own blend of spices. Generously apply an even layer of the rub over and *under* the skin. Don't be afraid to lift the skin gently to ensure the rub gets directly onto the meat. This will add another dimension of flavor to the brined chicken.
**Tip:** While we're focusing on a dry rub here, you always have the option to baste your drumsticks with your favorite BBQ sauce during the smoking process. If you choose this route, apply the sauce during the last 30-60 minutes of smoking to prevent it from burning or becoming overly sticky.
Smoking Time & Temperature
Place your seasoned chicken legs directly on the smoker grates, ensuring there's enough space between each piece for even smoke circulation. Close the lid and let the magic happen.
* **Target Internal Temperature:** Smoke the chicken legs until they reach an internal temperature of **175-180°F (79-82°C)** when checked with a reliable meat thermometer. While 165°F is technically safe for poultry, dark meat like chicken legs benefits from a slightly higher temperature to become truly tender and juicy.
* **Estimated Time:** This typically takes **2 to 3 hours** at 225°F, but remember, "if you're looking, you're not cooking." Trust your thermometer more than the clock.
**Achieving Crispier Skin (Again!):** If your skin isn't as crispy as you'd like at 175°F, you have a couple of options:
1. **Increase Heat:** Bump your smoker's temperature up to 350-375°F (175-190°C) for the last 15-20 minutes, monitoring closely to prevent burning.
2. **Quick Sear:** Transfer the legs to a hot grill or even a cast-iron skillet for a few minutes per side until the skin renders and crisps up.
Serving Up Your Masterpiece & Budget-Friendly Tips
Once your smoked chicken legs hit the target internal temperature and boast that beautiful, crispy skin, carefully remove them from the smoker. Allow them to rest for 5-10 minutes before serving. This brief resting period allows the juices to redistribute throughout the meat, ensuring every bite is as juicy as possible.
These smoked chicken legs are incredibly versatile. Serve them with classic BBQ sides like coleslaw, potato salad, baked beans, or cornbread. They're also fantastic on their own as a savory, satisfying meal.
One of the great advantages of focusing on chicken drumsticks is their affordability. Unlike more expensive cuts of meat, chicken legs allow you to practice and perfect your smoking techniques without a significant financial outlay. This makes them ideal for honing your BBQ skills and experimenting with different rubs, brines, and wood combinations. For more fantastic ideas on making the most of your budget while maximizing flavor, be sure to check out our guide on
Budget Smoked Drumsticks: Max Flavor & Crispy Skin in 7 Steps.
Conclusion
There you have it – a comprehensive, easy smoked chicken legs recipe designed to deliver ultimate juiciness and crispy skin every single time. By embracing the power of an overnight wet brine and incorporating the simple step of air drying, you'll transform humble chicken drumsticks into a smoky, flavorful masterpiece. This method proves that delicious, pitmaster-quality BBQ doesn't have to be complicated or expensive. So fire up your smoker, follow these steps, and prepare to delight your taste buds and impress your guests with truly unforgettable smoked chicken legs. Happy smoking!